Selectors are one of the first things you have to get to grips with when you start using CSS – and when you’re taking those initial baby steps, you could be forgiven for thinking there’s not all that much to them. It’s all IDs and classes – or simply selecting elements by their type (such as div or form) – and you can get by reasonably comfortably with this basic toolkit for a while, but it can only take you so far.
Once you start to scratch beneath this surface, you begin to discover that there might be a bit more to CSS selectors than you originally thought. And then a bit more. And more. And more. Then all of a sudden, you find yourself using CSS selectors to create tabbed content for your first website without JavaScript, target abstract sequences, and even style elements based on certain conditions, such as the number of sibling elements.
CSS Selectors Cheat Sheet
The Ultimate CSS Selectors Cheatsheet will take you beyond the basic toolkit and dive deep into this heady world of advanced, highly-functional CSS selectors that give you the kind of targeting power you never thought possible with CSS alone! Sound exciting? If so, some might say you need to get out more – but not me, for I know the wonders you are about to behold.
To whet your appetite, here’s a little taster of what’s covered in the cheatsheet…
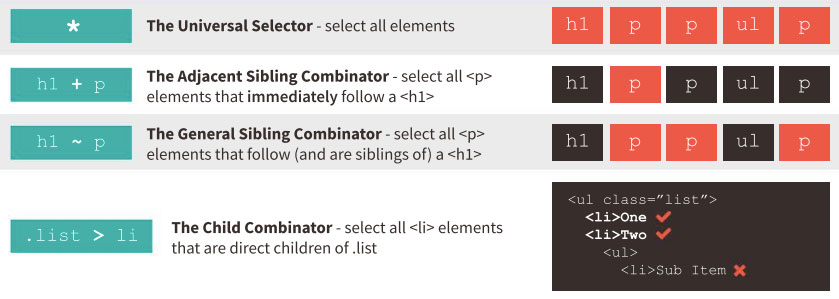
Basic CSS Selectors and Combinators
Combinators are the next step up from ID and class selectors, affording you greater control over how your styles cascade. For example, you can use the child combinator (>) to target only direct children of an element, preventing the styles cascading to the element’s grandchildren and beyond.
CSS Attribute Selectors
CSS attribute selectors allow you to target elements based on their attribute values. For example, input[type="submit"] would target only input elements that have a type attribute of “submit”.
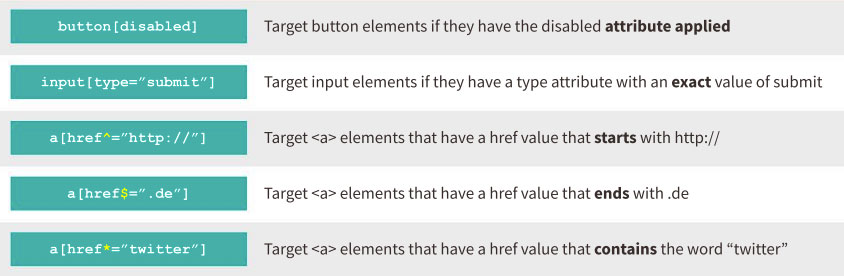
A snippet from the “Attribute Selectors” section of the cheatsheet
Pseudo-elements allow you to target elements (or areas of an element) that do not actually exist in the HTML, as opposed to pseudo-classes. Examples of pseudo-elements include :before, :after, :first-line and :first-letter.
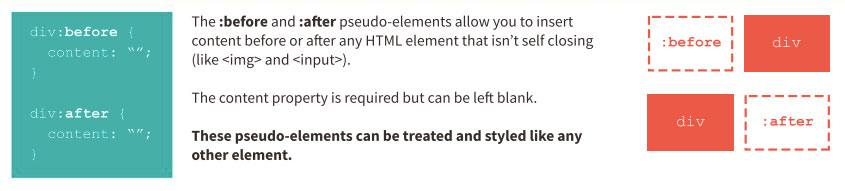
A snippet from the “Psuedo Elements” section of the cheatsheet
State Based Pseudo-classes (the boring ones)
These pseudo-classes allow you to target elements based on their current state, and should be very familiar to anyone with some experience writing CSS. Examples include :hover, :visited and :focus.
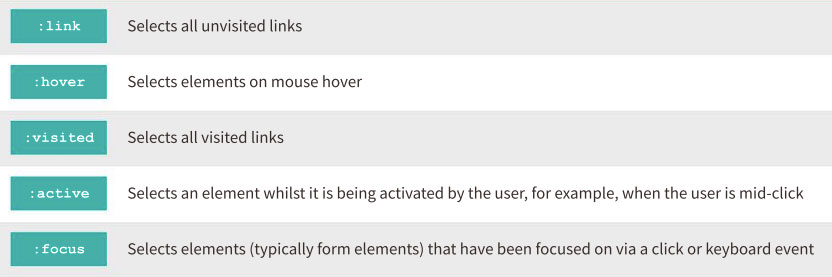
A snippet from the “State Based Pseudo Classes” section of the cheatsheet
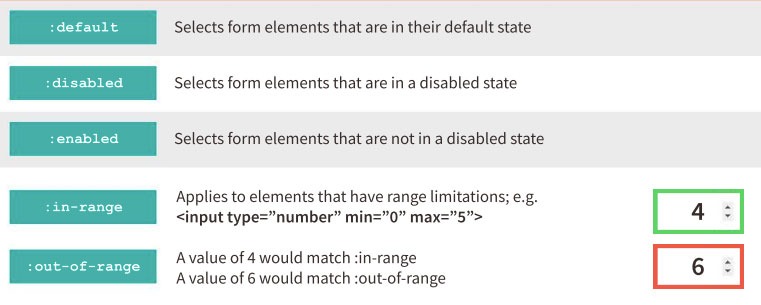
Form & Validation Pseudo-classes (more mostly boring pseudo-classes)
There are a wide range of input based pseudo-classes, many of which go under the radar due to the specific nature of their use cases. Examples include :valid and :invalid, which you could use to style an email field based on whether its current value is a valid email address or not.
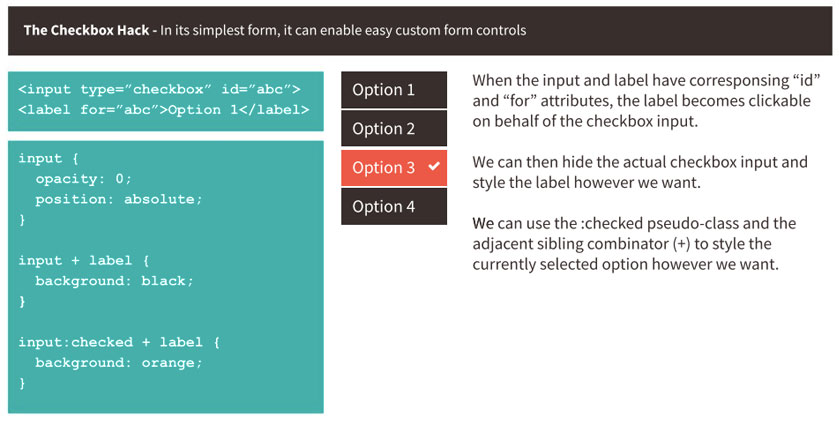
Another example is the :checked pseudo-class, which allows you to target radio buttons and checkboxes when they have been selected by the user – this doesn’t sound all that inspiring, but this particular pseudo-class has opened many doors in CSS through a technique that has come to be known as “The Checkbox Hack“.
A snippet from the “Form & Validation Pseudo-classes” section of the cheatsheet
The Structural Pseudo-classes (a bit more fun)
These pseudo-classes allow you to target elements based on their position in the HTML structure. The simplest examples are :first-child and :last-child, but there are many more at your disposal that afford you the ability to target any element you want, without the need to add a class or ID in the markup.
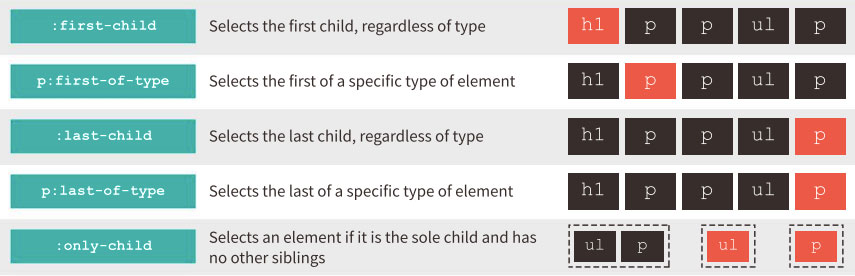
A snippet from the “Structural Pseudo-classes” section of the cheatsheet
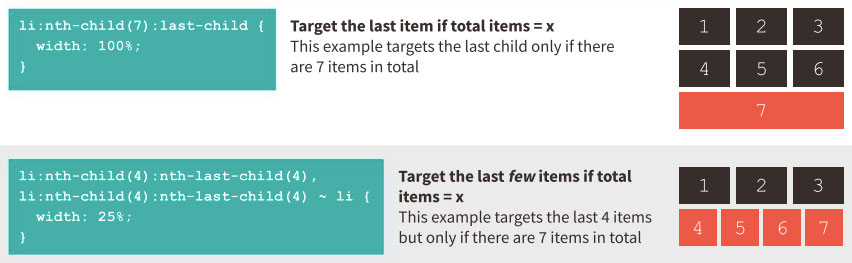
Nth-child Expressions (the fun stuff)
This is where the possibilities really start to open up. Typically, you can use nth-child expressions to target infinite sequences; for example, :nth-child(2n+1) would target every 2nd element starting from the first (so 1, 3, 5, 7, 9 and so on).
The cheatsheet takes things much further, showing how you can use negative numbers in your expressions to target the first (or last) x amount of items, how you can combine expressions to target ranges of elements, and how you can use multiple expressions to target more abstract element sequences.

A snippet from the “Nth-child Expressions” section of the cheatsheet
CSS If Statements?! (the mental stuff)
Ok, so now we can get really creative and start combining everything we’ve learnt so far into CSS selectors that essentially behave like conditional if statements.
A snippet from the “CSS If Statements?!” section of the cheatsheet
Let’s quickly walk through how to build one of these conditional CSS selectors. For this example, let’s say we have a layout in which our goal is to have 2 rows of boxes, where the boxes on each row are equal widths. However, in this example scenario, sometimes there will be 6 boxes in total, and sometimes there will be 7 boxes in total. If we give the boxes a width of 33.333% then we might end up with 2 rows of 3 and an odd box sitting on an additional row. To avoid that, we want to target the last 4 boxes and give them a width of 25% to get them all on the 2nd row, but only if there are 7 boxes in total.
To do that, we first of all need to select the 4th element:
li:nth-child(4)So far, so simple. Next, we need to attach a 2nd nth-child rule to this selector, but this time it should select the 4th to last element.
li:nth-child(4):nth-last-child(4)This selector will now target the box that is both 4th from the start and 4th from the end. Both of these conditions can only be true if there are 7 boxes in total, so this selector will only be utilised if the total is 7!
Now, we can use the General Sibling Combinator (~) in an additional selector to target everything that follows that 4th element.
li:nth-child(4):nth-last-child(4),
li:nth-child(4):nth-last-child(4) ~ li {
  width: 25%;
}
And there we have it! These two selectors will now select the last 4 boxes, but only if there are 7 boxes in total!
Bonus Content
To finish up, The Ultimate CSS Selectors Cheatsheet also provides some useful bonuses, such as the infamous Checkbox Hack mentioned previously, and the highly practical “Lobotomised Owl Selector” brought to prominence by Heydon Pickering.
A snippet from the “Bonus Content” section of the cheatsheet
At six pages, this really is the ultimate cheatsheet for CSS selectors. Hopefully you find it useful – and if you do, please feel free to share it far and wide! Conversely, if you think we’ve missed anything, go ahead and leave a comment below.